파이썬 딥러닝 - 06. 케라스 모델 저장하고 불러오기
2020. 1. 12. 21:28ㆍTech :Deep Learning
케라스에서는 save() 함수 하나로 모델 아키텍쳐와 모델 가중치를 h5 파일 형식으로 모두 저장할 수 있다.
모델 저장 소스코드 (MNIST DATA)
# 0. 사용할 패키지 불러오기
from tensorflow.python.keras.utils import np_utils
from tensorflow.python.keras.datasets import mnist
from tensorflow.python.keras.models import Sequential
from tensorflow.python.keras.layers import Dense,Activation
import numpy as np
from numpy import argmax

# 1. 데이터셋 준비하기

# Training set과 Test set 불러오기
(x_train,y_train),(x_test,y_test) = mnist.load_data()

# Dataset Preprocessing
x_train = x_train.reshape(60000,784).astype('float32') / 255.0
x_test = x_test.reshape(10000,784).astype('float32') / 255.0

# Label data one-hot encoding
y_train = np_utils.to_categorical(y_train)
y_test = np_utils.to_categorical(y_test)

# Training set과 Validation set 분리
x_val = x_train[:42000]
y_val = y_train[:42000]
x_train = x_train[42000:] #훈련 셋의 30%를 검증 셋으로 사용
y_train = y_train[42000:]

# 2. 모델 구성하기
model = Sequential()
model.add(Dense(units=64,input_dim=28*28,activation='relu'))
model.add(Dense(units=10,activation='softmax'))

# 3. 모델 학습과정 설정하기
model.compile(loss='categorical_crossentropy',optimizer = 'sgd',metrics=['accuracy'])

# 4. 모델 학습시키기
from tensorflow.python.keras.callbacks import EarlyStopping
early_stopping = EarlyStopping(patience=20)
hist = model.fit(x_train,y_train,epochs=1000, batch_size=10, validation_data=(x_val,y_val),callbacks=[early_stopping])

# 5. 학습 과정 살펴보기
%matplotlib inline
import matplotlib.pyplot as plt

fig, loss_ax = plt.subplots()

acc_ax = loss_ax.twinx()

loss_ax.plot(hist.history['loss'],'y',label='train loss')
loss_ax.plot(hist.history['val_loss'],'r',label='val loss')
acc_ax.plot(hist.history['acc'],'b',label='train acc')
acc_ax.plot(hist.history['val_acc'],'g',label='val acc')

loss_ax.set_xlabel('epoch')
loss_ax.set_ylabel('loss')
acc_ax.set_ylabel('accuracy')

loss_ax.legend(loc='upper left')
acc_ax.legend(loc='lower left')
plt.show()

# 6. 모델 평가하기
loss_and_metrics = model.evaluate(x_test,y_test,batch_size=32)

print('##### Test Result #####')
print('loss : ',str(loss_and_metrics[0]))
print('Accuracy : ',str(loss_and_metrics[1]))

# 7. 모델 저장하기
from tensorflow.python.keras.models import load_model
model.save('mnist_mlp_model.h5')
위 코드를 돌리고 나면 파일
이 생성된다.
저장된 파일은 아래의 정보를 담고 있다.
|
- 나중에 모델을 재구성하기 위한 모델의 구성 정보 - 모델을 구성하는 각 뉴런들의 가중치 - 손실함수, 최적화하기 등의 학습 설정 - 재학습을 할 수 있도록 마지막 학습 상태 |
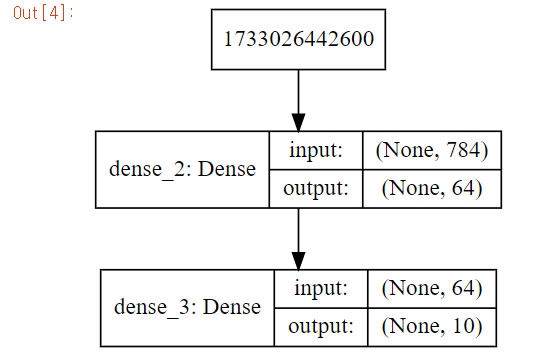
해당 모델의 아키텍쳐를 보려면 model_to_dot() 함수를 이용하면 가시화할 수 있다.
from IPython.display import SVG
from tensorflow.python.keras.utils.vis_utils import model_to_dot

%matplotlib inline

SVG(model_to_dot(model,show_shapes=True).create(prog='dot',format='svg'))
저장된 모델을 불러와 test하는 코드 )
# 0. 사용할 패키지 불러오기
from tensorflow.python.keras.utils import np_utils
from tensorflow.python.keras.datasets import mnist
from tensorflow.python.keras.models import Sequential
from tensorflow.python.keras.layers import Dense, Activation
import numpy as np
from numpy import argmax

# 1. 실무에 사용할 데이터 준비하기
(x_train,y_train),(x_test,y_test)=mnist.load_data()
x_test = x_test.reshape(10000,784).astype('float32') / 255.0
y_test = np_utils.to_categorical(y_test)
xhat_idx = np.random.choice(x_test.shape[0],5)
xhat = x_test[xhat_idx]

# 2. Model 불러오기
from tensorflow.python.keras.models import load_model
model = load_model('mnist_mlp_model.h5')

# 3. Model 사용하기
yhat = model.predict_classes(xhat)

for i in range(5):
    print('True : ',str(argmax(y_test[xhat_idx[i]])),', Predict : ',str(yhat[i]))
위 코드를 실행하면 파일로부터 모델 아키텍쳐와 모델 가중치를 재구성한 모델의 결과가 잘 나오는 것을 확인 할 수 있다.
* predict_classes함수는 Sequential 기반 모델에서만 사용가능하다.
'Tech :Deep Learning' 카테고리의 다른 글
| 파이썬 딥러닝 - 07. Layer 의 종류 (1) | 2020.01.12 |
|---|---|
| 파이썬 딥러닝 - 05. EarlyStopping (0) | 2020.01.12 |
| 파이썬 딥러닝 - 04. 케라스 학습 과정 (0) | 2020.01.12 |
| 파이썬 딥러닝 - 02. 케라스 개발환경 구축 (0) | 2020.01.04 |
| 파이썬 딥러닝 - 01. 케라스 소개 (0) | 2020.01.04 |